Promathia Mission 4-4: Slanderous UtteringsWalkthrough * Head to the top floor of the Tavnazian Safehold and go behind the Walnut Door and walk towards Despachiaire (K-10) for a cutscene.
* Head to the basement of Tavnazian Safehold and zone into Sealion's Den. Inspect the Iron Gate at (H-6) inside Sealion's Den to end the mission.
* Go back to the top floor, through the Walnut Door, and speak with Despachiaire for another cutscene.
*
(Optional) Talk to Parelbriaux at (K-7) for an extra cut scene.
*
(Optional) Head to Northern San d'Oria and talk to Chasalvige (Manuscript Room, Cathedral) at L-6 and he'll tell you to investigate the port.
*
(Optional) Head to Port San d'Oria and talk to Anoki at H-6 and he'll say that he say he hasn't seen anything that you describe.
Promathia Mission 5-1: The Enduring Tumult of War Walkthrough* Zone into Port Bastok for a cutscene.
* Head to Metalworks and talk to Cid at H-8 for a cutscene.
* Zone into Pso'Xja from Beaucedine Glacier at F-7 for a cutscene.
* This Pso'Xja tower is uncapped. Follow the path forward until you find a stone door, which, when checked, spawns an NM Golem named
Nunyunuwi.
* This NM has approximately 3500 HP, though offset by an innate Auto Regen trait that restores 100 HP per tick. If improperly handled, this effect can draw the battle out indefinitely.
* Note: Any melee Job at 75 can solo this NM but any weaker jobs such as WHM will probably need (or just want) another damage dealer job to speed up the fight.
* Soloed by a 67BLU/NIN by spamming Frenetic Rip, Bludgeon, and Mandibular Bite.
* Soloed by a SAM69/WAR34 by 2houring and starting with 300 tp.
* Soloed in less than 10 seconds as 75PUP/WAR with Harlequin frame (Dragon Kick to a full power Magic Mortar to instantly defeat it with the resulting Light skillchain. Mine did 800 Dragon Kick, 1700 Magic Mortar with 1700 Light.)
* Was EASILY defeated by LV75SMN with predator claws.
* Soloed by a PLD75/RDM37 with Bio II/Poison DoT and straight tanking. Casted Stoneskin/Blink/ProIV/ShellIII/Blaze Spikes/Phalanx before engaging, but most likely didnt need it
* Too weak for 74RNG/NIN using Hellfire + Silver Bullets, store TP from any mob nearby and open with velocity Shot and Sharpshot, pop a Slugshot, Barrage, then Slugshot and closed with EES, 30 seconds max.
* Soloed by 75 Scholar/RDM with Blink, Phalanx, Stoneskin and Sublimation fully charged. 2-hour Tabula Rasa is advised using to speed up the killing time. Nuking with Parsimony + Alacrity + Ebullience + Thunder IV/Blizzard IV kill it within 5 mins.
* Easily done by 75 RDM/BLM with Chainspell + Blizzard III. Nukes didn't seem to be resisted at all, usually hitting around 600 with a critical of over 700.
* When Nunyunuwi is defeated, check the door to move past it.
* It is advisable to cast Sneak or use a Silent Oil then head down the elevator.
* Check the Stone Door for a cutscene. You will arrive in Promyvion - Vahzl, where you will get another cutscene.
Promathia Mission 5-2: Desires of Emptiness 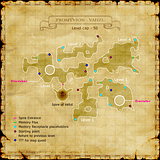 Walkthrough
 * Promyvion - Vahzl is five levels instead of four, and the mobs are stronger to match. Like the other Promyvions, it's only tough if you or your party is aggroing everything in sight. Be patient, wait until openings occur. It can be done.
* Promyvion - Vahzl is capped at level 50, so be sure to bring the appropriate gear.
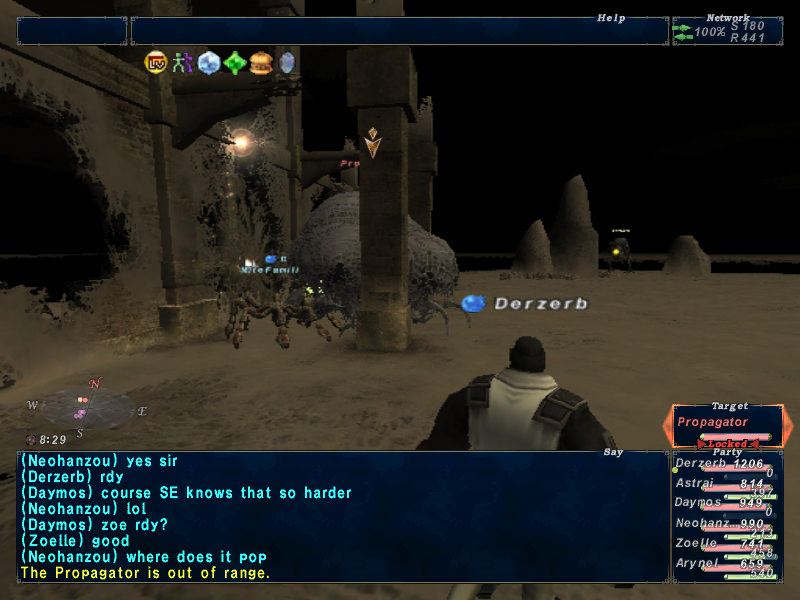
* On levels three, four, and five, you will have to search for
Memory Flux gates. They will spawn NMs; these are mandatory fights and required to proceed with the mission. The one on the third floor is a
Propagator(Gorger type), on the fourth floor, a
Solicitor(Craver type), and on the fifth floor, a
Ponderer(Thinker type with AOE Sleep so bring poison pots). After you defeat each NM, check the Memory Flux a second time for a cutscene. Then heal up and search for the next Memory Receptacle.
* If you have a Paladin tank, make sure they don't eat defense food when you're getting close to Ponderer. If it absorbs a Tavnazian Taco and Protect it is almost impossible to hurt with melee attacks.
* Each time you get the cutscene, you’re given the option to warp to that Memory Flux from the gate in Pso'Xja. So, after you beat a Memory Flux, you can resume there later without starting over.
* If you don’t defeat all three Memory Flux NMs and get the cutscenes at those areas, you will not be able to cross to the Web of Recollections within the Spire of Vahzl.
* Enter the Web of Recollections and be prepared to face each of the earlier Promyvion bosses one at a time. From left to right, they are
Procreator(Gorger type),
Cumulator(Craver type), and
Agonizer(Thinker type).
* You can choose which boss to fight first; the next boss in the sequence will then aggro when the previous is at about 20% HP.
* If you pull Cumulator first, Procreator attacks next, and then Agonizer.
* If you pull Agonizer first, Cumulator attacks next, and then Procreator.
* If you pull Procreator first, Agonizer attacks next, and then Cumulator.
Strategy tips * As with all Empty, their elements will be random. Make sure to note the bosses' elements so as not to cast spells that will be ineffective.
* The Procreator can usually be tanked for some time when it's HP is high without having to fear bad TP moves or an invasion of the Offspring.
* The next boss in the sequence will always aggro when the current boss is at 20% HP. Delay this mob with Terroanima and/or Bind/Shadowbind until you can finish off the weakened mob, which shouldn't take long. Also Rdm can kite with Stoneskin/Phalanx and Bind.
* If you have a NIN, after the first NM has reached 20% and the 2nd NM begins its attack, the 2nd NM can be easily kited by the NIN while the rest of the party rests. This can also be done with the 2nd NM at 20%; the NIN would kite the 3rd (final) NM while the party rests. Make certain that the NIN has Haste at all times while kiting; also, the occaisonal Gravity will assist with Utsusemi timers. (Clear time for the BC using this NIN kite method was 17min~).
* If your party has a full set of anima, use one Psychoanima/Hysteroanima pair at about 50%, and a second at about 25% on each boss. If you only have one set per boss, use it at 25%.
* Watch out for Cumulator's Impalement early on. If it kills the tank, it's probably easier to leave the BC and try again. Impalement is a move similar to throat stab. As such it will always deal a very large amount of damage, but will not kill the player. The following normal attack is the main threat.
* Any Offspring Procreator spawns will die when it dies, so just finish it off to get rid of the Offspring. If the Procreator is a problem below 30% because of the spawns, have a PLD, with Invincible ready, use Invincible @20-30% to maintain hate of the Procreator and its spawns (spawn hate is shared with the Procreator) while the rest of the party finishes it off.
* Agonizer continues to be the strongest. The Agonizer can use an ability called Negative Whirl which is a moderately powerful AoE that hits for 270~. A Hysteroanima is highly recommended for the Agonizer at 20% and lower to avoid Negative Whirl spam. Negative Whirl is a huge problem if you've have been inflicted with Curse (max HP and MP down to 75% of normal) and Sleep from its ability Shadow Spread; many melee will only have 400-600 HP max. Save resources (2-hours, MP, etc.) for finishing it quickly. Use Poison Potions if you brought any to awake you from Shadow Spread.
* Blue Mage's Headbutt is very helpful, as it can prevent many melee and TP attacks by the bosses. Two BLU can make this BC so much easier by creating a Headbutt rotation. The NMs hardly get a chance to use attacks or special abilities using this method.
* The tank must not eat defense food until Agonizer is dead. If you have a Paladin tank, pulling Agonizer first allows them to use food for the other two bosses.
* With a setup including two or more BLM it is possible to win this fight without using anima or 2-hours (a good setup example is RDM, BLM x2, NIN x2 and WHM because this setup minimises the TP gain of the enemy). The strategy is to have the black mages both cast Freeze at 19-22% to kill the boss you are fighting, and have one NIN temporarily tank or a RDM Gravity kite the next one for a few seconds if necessary. It is better to use Freeze a little bit too late than too early, as the idea is to make sure the boss you are fighting dies from the spells, then have the black mages heal to full in a safe corner and repeat the same thing on the next. Naturally if you have more than two BLM it is probably safe to start casting around 25%.
* Also a setup of WHM, RDM, SAM (tank), and 3 DDs can be used throughout all the fights. Have everyone bring full sets of anima, and do not use any until you fight in the BCNM. Just be sure the mages stay back away to avoid the AoE, and all DDs to bring poison potions.
* Another setup that makes this BC easy—yes easy—is PLD NIN BLU BLU WHM RDM. Poison pots are recommended, 2-3 per BC. Only 1 Hysteroanima was used for the Cumulator at 20%. Read/use the above dual BLU method and Procreator PLD Invincible information to complete this strategy.
* You will receive 1500 experience for winning the fight.
* When the Spire battle is cleared, head out to Beaucedine Glacier and talk to the three Tarutaru in the tower at (I-7). There will not be a cutscene from the three Tarutarus, nor will the mission log change.(optional)
Completing the Mission In order to complete the mission, talk to Cid in Bastok Metalworks for a cutscene.
Original Link:http://wiki.ffxiclopedia.org/wiki/Promathia_Mission_5-2